Main Plot (Act 1)
Getting to the Crime Scene
Depending on which path you took to get out of Kiba Reefings (Kyslr’s inventory gate or Shureni’s secret tunnel), you’ll eventually end up at the trolley attack site sooner or later. Kyslr’s path is more hostile but faster while Shureni’s is safer but you’ll have more trouble at the crime scene. You’ll encounter some passive or hostile wild life as you go, though the Kyslr path will be more hostile. Some platforming and so on will be required.
Stunning Vs. Subduing Vs. Killing
You’ll end up in combat situations where you can only take care of an opponent with one approach. But these situations will be made clear beforehand. Otherwise, you’ll have the option to…
- STUN an enemy by getting their health to a certain point/using a high-damage attack/using specific tools to temporarily immobilizing them. You’ll have a limited time to take care of what you need in that area before the enemy has recovered. Some enemies will flee afterward while others will continue after you.
- SUBDUE an enemy by tricking them into pits or trapping them with gear. This will consume expensive or limited resources but ensures that the enemy isn’t killed. Some enemies will get free from this but only if …
- A: The method of subduing the enemy isn’t designed for them (like a small net being thrown on a bear).
- B: A certain amount of time has passed after the Protagonist has left the area.
Additionally, certain kinds of subdued enemies can be reported to the Jaroko Guards or other individuals to be collected/interacted with later.
- KILL enemies and they won’t bother you anymore. You’ll even get certain buffs like your Hypothermia Meter improving or recovering health. Some enemies have to be killed but killing in this game has a strong impact on the relationship mechanic.
Hyperthermia Mechanic
Reenashim don’t do well in colder climates and Kro’Enx is an ice moon outside of all the terraformed sections. Whenever the Protag is in a hostile climate, you’ll have to deal with one of 3 Stages of hypothermia. Each one slows the Protagonist down at a different rate. You’ll see the Hypothermia Meter on your screen, which will go into its own 3-phase process.
- Phase One slows you down until you can’t run anymore.
- Phase Two disables dashing and will start to slowly drain your health.
- Phase Three disables all combat except firearms and drains your health further.
If you run out of health, you’ll respawn at a nearby plaza and your Crimson will have spread further along your body. The Crimson Meter will be discussed more in-depth later but the short version is it has pros and cons but if you want the best ending, you can’t have it get higher than a specific amount. You can buy/obtain certain items to reverse the Crimson spread to varying degrees but these are limited in supply.
If you run out of health before getting to the crime scene, you’ll wake up at Kiba Reefings and have to try again. If you run out after getting to the crime scene, you’ll wake up at the secondarily introduced plaza.
You can get different kinds of equipment and upgrades to better deal with the hostile climate stages. This early in the game, Stage 3 will automatically kill you but neither paths to the crime scene this early on will be higher than Stage 2.
You can also subvert the Hypothermia Meter by interacting with warm machinery or draining heat from enemy bodies. This won’t always help you enough, however.
The Crimson Mechanic
Every time you die, your Crimson spreads. A random part of your body will become more of this hot-pink tint with crimson veins. There are purchasable (or craftable) items you can use to immediately revert the changes, such as the Habernettes drug but you are on a time-limit.
The Crimson Mechanic will have a difficulty toggle option. There are three difficulty options.
- As long as you use a calming substance, admit yourself to a hospital before the end of your day, or use a more rare reversion item, all crimson spreads will revert.
- You’ll have an in-game time limit to consume enough calming substances or admit yourself to a hospital before the crimson spread is permanent. Using the rare reversion items will revert any crimson spread regardless of the day but are in limited supply.
- You’ll have an in-game time limit to admit yourself to a hospital or use the rare reversion items to revert the crimson spread. Calming substances will not cure you but they can give you more time. Using the rare reversion items will revert any crimson spread regardless of the day but are in limited supply. Once you reach fully crimson, you’ll only have one opportunity to revert from that state. Additionally, your time limit will speed up depending on your Hypothermia environment stage.
There are pros and cons to the Crimson spread but you will be locked out of the best ending if you reach 50% crimson or higher. There are 7 stages of the Crimson Spread. You start at stage 1 with your arm already being crimson when you start the game. This can’t be reverted. With every stage of the Crimson Spread, you’ll get a speed and strength boost.
Once you reach 50%, you’ll no longer be able to use the STUN mechanic. Instead, enemies will receive bonus damage. The Protagonist will no longer feel concerned about sparing enemies. You’ll get a dash bonus and unlock additional attacks. Your relationship with certain characters will change as well. I say change and not go down because some characters will look at your more feral change as positive. The Jaroko Guards generally will see this positively in a warrior way. Sheruni will be positive about this, seeing it as your true nature. Kyslr will be terrified and Bu’leyg will be disappointed.
Once you reach 100%, you no longer use the STUN or SUBDUE method. All your attacks are kill-based. Your melee/bare-hand attacks will get a boost while firearms will get a debuff. You’re the strongest and fastest possible in the game and you’ll get a passive healing factor. And at this stage, a lot of characters won’t interact with you anymore while a select few will actually think highly of you, such as Sheruni.
It goes without saying but reverting Crimson doesn’t undo any relationship-altering actions you committed to (such as killing a number of enemies) but characters will revert their relationship status to where it was at before your last spread level.
The Crime Scene
Getting to the crime scene via Kyslr’s route will give you some extra time alone. Much of the area has already been cleaned up but the trolley path is closed off. You can see some gene trails leading down an unmarked path where you’ll confront one of the hulking creatures. The creature is fighting with one of the Jaroko Guards. You kill the creature and it will decay rapidly. The Jaroko Guard can die or survive. If he survives, he’ll express some gratitude. He’ll then notice the corpse was carrying some kind of item (some currency probably). He’ll take a sample of the creature’s blood and give it to you along with the item, instructing you to take it to the nearest plaza for testing. And you’ll see that the creature looked more humanoid when it died.
More Jaroko Guards will show up but the first guard will vouch for you and have them escort you to the nearest plaza. He’ll pass out before he can explain the blood vial to them, however, leaving it in your possession without the guards aware.
If the guard dies, the guards who arrive will recognize what’s happened and assume you were fighting the creature rather than the guard. But they’ll more forcefully escort you to the nearest plaza.
If you take Shureni’s route, there are Jaroko Guards at the crime scene already. You have to sneak around them. The cave will have a dead Jaroko Guard but no creature. You can obtain the blood sample by getting to the cave first and escaping before you’re caught. You can also get caught and have the blood confiscated.
Either way, you either sneak into–or are escorted into–the nearest plaza afterward. So, just to recap the path system here…
Pathing
- S2A: You followed Kyslr’s route and arrive at the crime scene before more Guards arrive.
- S2AA: You kill the beast and save the guard, getting bonus item and the blood sample with friendly escort out.
- S2AB: You kill the beast but the guard dies. You are escorted out.
- S2B: You followed Sheruni’s route and arrive at the crime scene when the Guards have already arrived and one guard is already dead.
- S2BA: You sneak into the nearest plaza or are escorted into the nearest plaza without the blood vial.
- S2BB: You sneak into the nearest plaza with the blood vial.
To summarize the results so far of all chosen paths…
- S2AA
- Alien Boy Alive [AB-1 (Name to be decided)]
- Jaroko Trolley Guard Alive [JG-T1 (Name to be decided)]
- Kyslr Gate Path Taken/Kyslr Relationship = Good
- Sheruni Relationship = Neutral
- Jaroko Cave Guard Alive [JG-C1 Name to be decided)]
- Bonus Cave Item In Possession
- Blood Vial In Possession
- Jaroko Guards Relationship = Semi-Good
- Branches from Scenario 1: Path AA (S1AA)
- S2AB
- AB-1 Alive
- JG-T1 Alive
- Kyslr Gate Path Taken/Kyslr Relationship = Good
- Sheruni Relationship = Neutral
- JG-C1 Dead
- No Bonus Cave Item
- Blood Vial Confiscated
- Jaroko Guards Relationship = Neutral
- Branches from S1AA
- S2BA
- AB-1 Dead
- JG-T1 Dead
- Kyslr Relationship = Semi-Bad
- Sheruni Tunnel Taken/Sheruni Relationship = Semi-Good
- JG-C1 Dead
- No Bonus Cave Item
- Blood Vial Confiscated
- Jaroko Guards Relationship = Semi-Bad
- Branches from S1AB (or) S1B
- If S1B Branch, Pistol Confiscated
- S2BB
- AB-1 Dead
- JG-T1 Dead
- Kyslr Relationship = Semi-Bad
- Sheruni Tunnel Taken/Sheruni Relationship = Semi-Good
- JG-C1 Dead
- No Bonus Cave Item
- Blood Vial In Possession
- Jaroko Guards Relationship = Semi-Bad
- Branches from S1AB (or) S1B
- If S1B Branch, Pistol In Possession
Once you get to the second plaza, the plan is to have these paths converge to a degree. S2AA has the most permanent effects: the kid and both guards are alive and you have the blood vial. S2AB has the kid and one guard alive but the second guard is dead and you don’t have the vial. S2BA has the kid and both guards dead and you don’t have the blood vial. And S2BB has all three characters dead but you have the blood vial and the pistol.
Introduction to Relationship System
You’ll notice relationships being a factor as well. This relationship system have 5 Phases: Bad > Semi-Bad > Neutral > Semi-Good > Good. You aren’t going to be able to grind certain traits or items to change your relationships. Instead, it entirely depends on key actions you take which permanently affect the story, and characters will react differently based entirely on their unique values.
For example, the death of the alien boy.
- Jaroko Guards don’t hold you responsible for the boy’s well-being. That’s their job. So their relationship with you doesn’t change.
- Sheruni doesn’t hold you responsible for the boy’s well-being. If you failed to defend the boy or weren’t there when the death happened, Sheruni’s relationship with you doesn’t change.
- Kyslr doesn’t think rationally about the boy’s death and thinks you should have done something more. So her standing with you will go down by one point. (Starting off Neutral and going down to Semi-Bad).
Jumping ahead to a second plaza scenario, if you have the blood vial on you, you can choose to hand it over to the authorities or take it back to Kiba Reefings to show Sheruni or Bu’leyg.
- If you take the vial to Kiba Reefings, your standing with Bu’leyg and Sheruni goes up.
- If you give the vial to the authorities in the second plaza, Bu’leyg will remain as is but Sheruni’s relationship with you will go down, as she’ll be disappointed in you “bending to the corrupt authorities”.
- And of course Kyslr doesn’t know about the vial so her relationship doesn’t change from this.
There will be plenty of opportunities to increase/decrease your standing between 1 and 2 points.
- The second plaza will give you a chance to show off your firearms skills to the Jaroko Guards and get a relationship point with them.
- If you get a certain experience rank in a certain number of firearms, your standing with the Jaroko Guards will increase because they see you as capable. But Sheruni will look down on you for relying on firearms.
- If you level up with melee weapons, particularly culturally-related ones, Sheruni will think higher of you and the Jaroko Guards will be indifferent.
- If you kill a lot of wild life instead of just incapacitating them, Bu’leyg, Kyslr, and Sheruni will look down on you but the Jaroko Guards won’t care until you kill a certain number higher.
- If you kill a certain number of Jaroko Guards, Bu’leyg, Kyslr, and the Guards will look down on you but Sheruni will remain neutral.
Quick Concept Art Time!

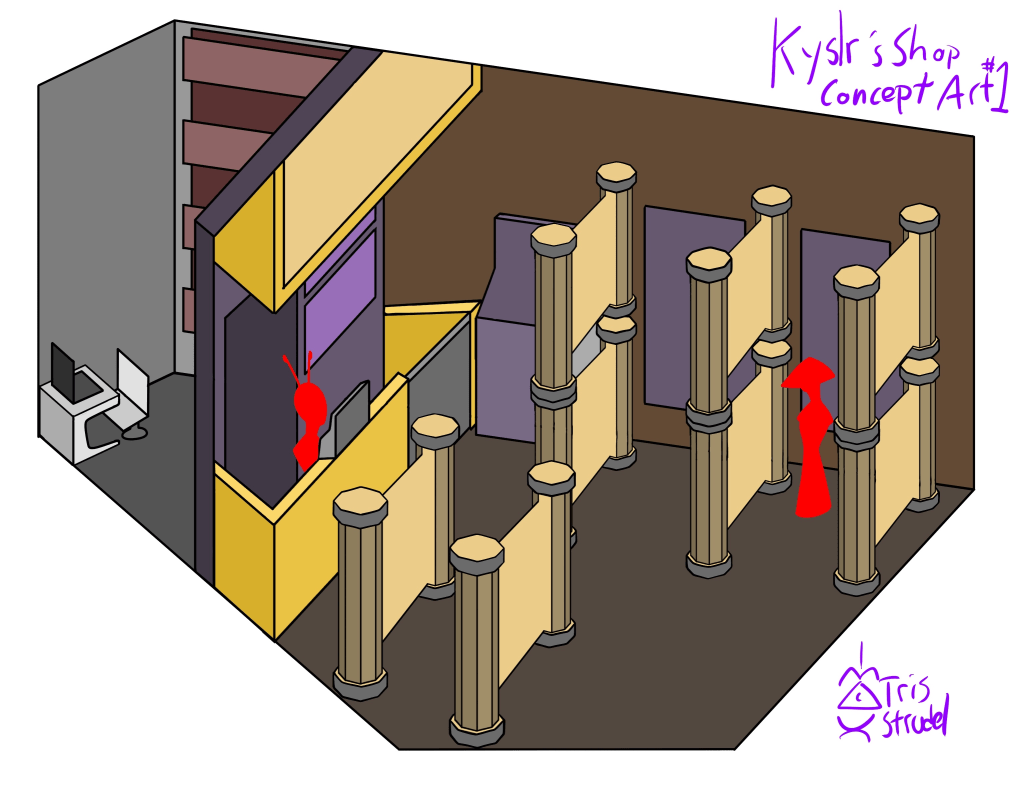
I’m admittedly not that fond of the presentation here but this is the first general draft of what Kyslr’s shop would look like in-game. Of course, a lot more detail would be added to the final version. The octagonal stands with the walls would act as shelves, there’d be a sort of ATM in the top center wall, some hanging shelves on the wall, and a small storage room in the back with a computer.
Outside will have some more custom decorations and styling. I wanted to make the colors of the shop feel like Kyslr and give a sort of Autumn feel with the faded purple, oranges, and yellows. And the plant outside the front door has a belt ring meant to symbolize Kyslr being married: something she’s very outspoken about and proud of.
I like the look overall but I’ll have to work on the proportions as I move forward. In-game, you’ll only see the shop from one angle so I want to make sure everything is relatively in frame. One thing I wasn’t fond of in Hyper Light Drifter is how easily you could lose the player character behind a pillar or wall, especially in combat.
Glossary Time!
- STUN, SUBDUE, and KILL Mechanics
Methods of dealing with enemies in-game: stunning temporarily, trapping for later collection or temporary safety, or killing permanently. The methods you choose affect relationships and will have buffs or debuffs alongside costing resources/currency. - HYPERTHERMIA Mechanic
Environmental Hazard that slowly affects the Protagonist’s mobility, health, and combat abilities. Using specific gear, items, or environmental aids, you can counteract this. - CRIMSON SPREAD Mechanic
Upon dying, the Protagonist’s body will change in up to 7 stages, causing him to act more aggressively and gain buffs but affecting your ending and in-game relationships. Certain items, consumables, and hospitals can help counteract this.
Any feedback is welcome, especially if there’s an aspect of the game one might want more clarity on.

Leave a comment